DIY Reports
by Identity
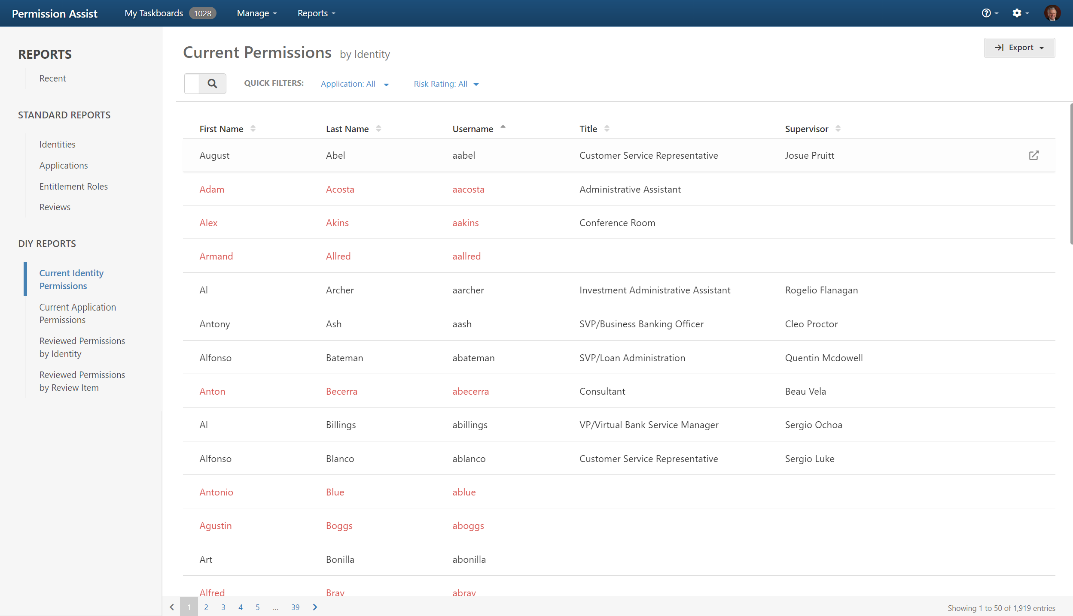
To open the Current Permissions by Identity page:
-
Go to the Reports menu and select DIY Reports > by Identity. The Current Permissions by Identity page (see picture below).
To export this list of identities:
-
Use the quick filters at the top of the page to sort the Identities as needed. Then, select the Export button (
 ) in the upper right corner of the page.
Filter Identities by Application, Review, and Risk Rating
The list of identities can be sorted/filtered by any of the following options:
|
Option |
Description |
|---|---|
|
Application |
This option allows you to filter the list of identities to show only those with access to a specific application. For example, to see only the identities that have access to Active Directory, select the Application quick filter and select the Active Directory application. |
|
Risk Rating |
This option allows you to filter the list of identities to show only those that have privileges with a specific risk rating. For example, to see only the identities that have critical permissions, select the Risk Rating filter and clear all check marks except the one next to Critical. After the list is filtered, you can select any of the identities appearing in the list to see more detailed information about the critical permissions they've been assigned. |
Each of these filtering options can be combined as needed. For example, to display a list of identities within a specific application that had critical permissions, select a specific application and then risk rating.
Export Identity Privileges
The Export feature allows you to print a report that shows all identities within all applications. To export the Permission Assist Identity Privileges Report:
-
Filter the list of identities to show only the identities you want to appear on the report.
-
Select the Export button (
) in the upper right corner and then pick the report format (Excel or PDF). The Save As dialog box appears. -
Navigate to the folder to which you want to save the report, and select the Save button. The report is saved.
View/Export Privileges of a Specific Identity
To view or export a list of privileges associated with a specific identity:
-
On the Identity Privileges page, select an identity within the list. The Individual Details page is displayed, allowing you to view detailed information for the identity including any permissions that match the selected filter criteria. For example, if the list of identities was filtered by both Last Applicable (for the review) and Critical (for the privileges), this page will show the identity's critical privileges that appeared in the most recent review.
-
Select Export button (
) in the upper right corner and then pick the report format (Excel or PDF). The Save As dialog box appears. -
Navigate to the folder to which you want to save the report, and select the Save button. The report is saved.
Viewing Reviewed Permissions by Identity
You can also view reviewed permissions by Identity by going to the Reports menu, selecting by Identity, and then selecting the Reviewed Permissions by Identity option on the left side of the page. The Reviewed Permissions by Identity page is displayed (see picture below).
To export this list of identities:
-
Use the quick filters to sort the Identities as needed. Then, select the Export button (
) in the upper right corner of the page.
Filter Identities by Application, Review, and Risk Rating
The list of identities can be sorted/filtered by any of the following options:
|
Option |
Description |
|---|---|
|
Application |
This option allows you to filter the list of identities to show only those with access to a specific application. For example, to see only the identities that have access to Active Directory, select the Application quick filter and select the Active Directory application. To remove a quick filter that has been applied:
|
|
Review |
This option allows you to filter the list of Identities to show only those within a specific review. To remove a quick filter that has been applied:
|
|
Risk Rating |
This option allows you to filter the list of identities to show only those that have privileges with a specific risk rating. For example, to see only the identities that have critical permissions, select the Risk Rating filter and clear all check marks except the one next to Critical. After the list is filtered, you can select any of the identities appearing in the list to see more detailed information about the critical permissions they've been assigned. To remove a quick filter that has been applied:
|
Each of these filtering options can be combined as needed. For example, to display a list of identities within a specific application that had critical permissions, select a specific application and then risk rating.
Export Identity Privileges
The Export feature allows you to print a report that shows all identities within the all applications. To export the Permission Assist Identity Privileges Report:
-
Filter the list of identities to show only the identities you want to appear on the report.
-
Select the Export button (
) in the upper right corner and then pick the report format (Excel or PDF). The Save As dialog box appears. -
Navigate to the folder to which you want to save the report, and select the Save button. The report is saved.
View/Export Privileges of a Specific Identity
To view or export a list of privileges associated with a specific identity:
-
On the Identity Privileges page,select an identity within the list. The Individual Details page is displayed, allowing you to view detailed information for the identity including any permissions that match the selected filter criteria. For example, if the list of identities was filtered by both Last Applicable (for the review) and Critical (for the privileges), this page will show the identity's critical privileges that appeared in the most recent review.
-
Select the Export button (
) in the upper right corner and then pick the report format (Excel or PDF). The Save As dialog box appears. -
Browse to the folder to which you want to save the report, and select the Save button. The report is saved.
by Application
To view the Current Permissions by Application page:
-
Go to the Reports menu and select DIY Reports > by Application . The Current Permissions by Application page (see picture below).
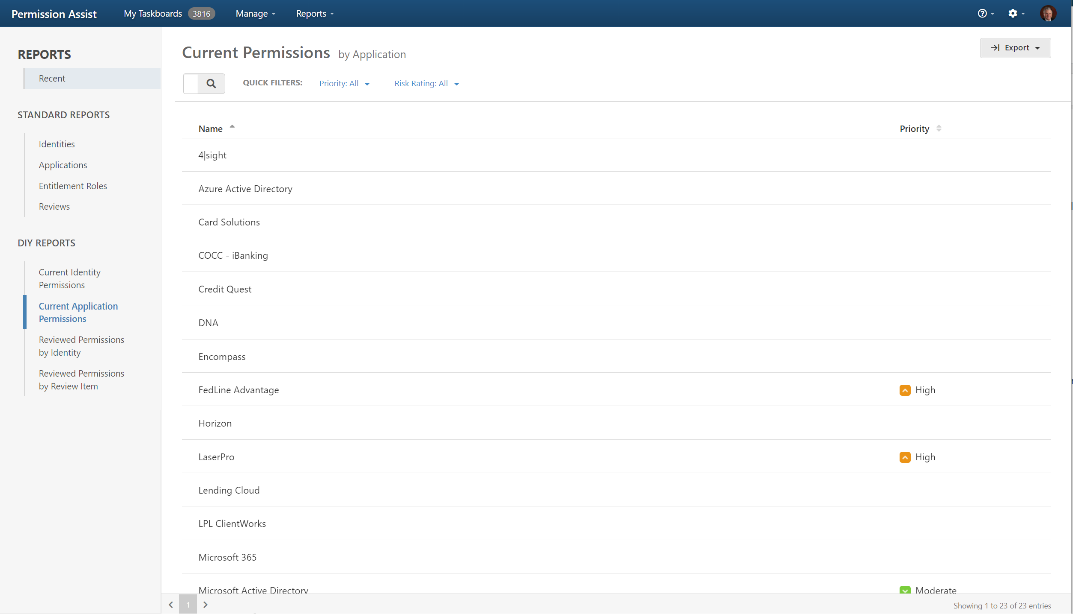
Filter Applications by Review, Priority, and Risk Rating
The list of applications can be sorted/filtered by any of the following options:
|
Option |
Description |
|---|---|
|
Priority |
This option allows you to filter the list of applications by priority (determined by the risk rating assigned at the application level rather than the privilege level). To remove a quick filter that has been applied:
|
|
Risk Rating |
This option allows you to filter the list of applications that have privileges of a specific risk rating. For example, to see only the applications that have critical privileges, select the Risk Rating filter and clear all check marks except the one next to Critical. After the list is filtered, you can select any of the applications appearing in the list to see more detailed information about the application and its critical permissions. To remove a quick filter that has been applied:
|
Each of these filtering options can be combined as needed. For example, to display a list of critical applications that have critical permissions, select a specific priority and then select a risk rating.
Export Applications
The Export feature allows you to print a report that shows all applications. To export the Permission Assist Application Privileges Report:
-
On the Current Permissions by Application page, filter the list of applications to show only the applications you want to appear on the report.
-
Select the Export button (
) in the upper right corner and then pick a report format (Excel or PDF). The Save As dialog box appears. -
Navigate to the folder to which you want to save the report, and select the Save button. The report is saved.
View/Export Application Details
To view or export detailed information associated with a specific application:
-
On the Current Permissions by Application page, select an application within the list. The Current Permissions by Application Details page is displayed, allowing you to view detailed permission information for the application including any permissions that match the selected filter criteria. For example, if the list of applications was filtered by both Critical priority and Critical Risk Rating, this page will show only the critical applications and the critical privileges within those applications.
-
Select the Export button (
) in the upper right corner and then pick a report format (Excel or PDF). The Save As dialog box appears. -
Navigate to the folder to which you want to save the report, and select the Save button. The report is saved.
by Review Item
To view Reviewed Permissions by Review Item page:
-
Go to the Reports menu and select by Review Item . The Reviewed Permissions by Review Item page is displayed (see picture below).
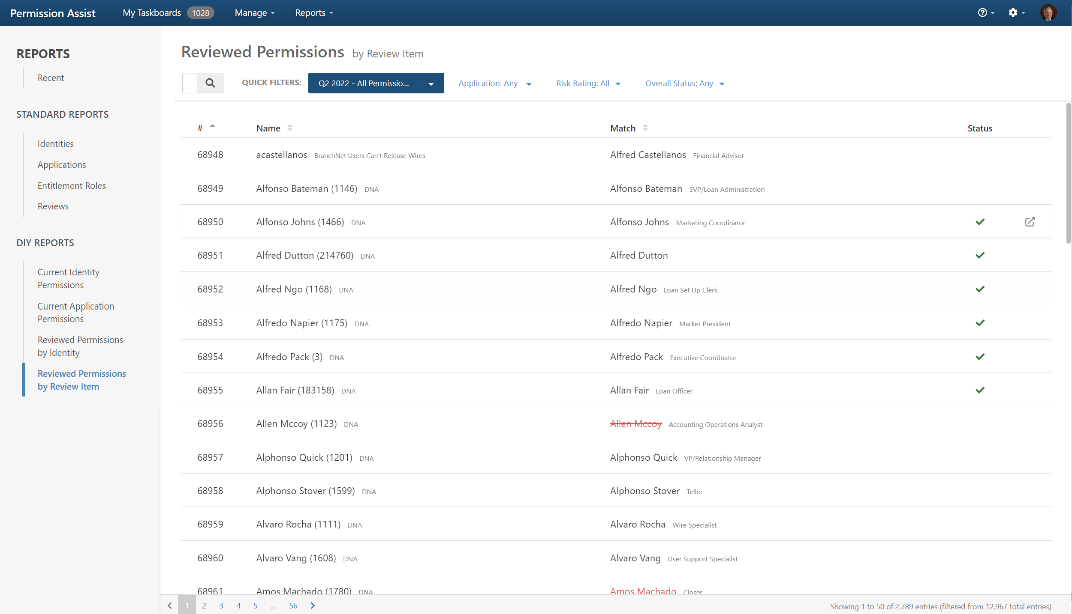
Filter Items by Review, Application, Risk Rating, and Overall Status
The list of applications can be sorted/filtered by any of the following options:
|
Option |
Description |
|---|---|
|
Review |
This option allows you to filter the list of items to show only those within a specific review. By default, items for all applications are displayed. To remove a quick filter that has been applied:
|
|
Application |
This option allows you to filter the list of identities to show only those with access to a specific application. For example, to see only the identities that have access to Active Directory, select the Application quick filter and select the Active Directory application. To remove a quick filter that has been applied:
|
|
Risk Rating |
This option allows you to filter the list of items to see only those that have privileges of a specific risk rating. For example, to see only the items that have access to critical privileges, select the Risk Rating filter and clear all check marks except the one next to Critical. After the list is filtered, you can select any of the applications appearing in the list to see more detailed information about the application and its critical permissions. To remove a quick filter that has been applied:
|
|
Overall Status |
This option allows you to filter the list of items by the overall status. For example, to see a list of all items that have completed the remediation process, select the Overall Status filter and clear all check marks except the one next to Flagged (Remediation Approved). After the list is filtered, you can select any of the items appearing in the list to see more detailed information about the application and its critical permissions. To remove a quick filter that has been applied:
|
Each of these filtering options can be combined as needed. For example, to display a list of critical applications within a specific review, you could filter by Review and then by Risk Rating.
View/Export Item Details
To view or export detailed information associated with a specific item:
-
On the Reviewed Permissions by Review Item page, select an item within the list. The Reviewed Permissions by Review Item Details page is displayed, allowing you to view detailed information for the item including any permissions that match the selected filter criteria. For example, if the list of items was filtered by both Active Directory (for application) and Critical (for the risk rating), this page will show any items that have access to critical permissions within Active Directory.
-
Select the Export button (
) in the upper right corner and then pick a report format (Excel or PDF). The Save As dialog box appears. -
Navigate to the folder to which you want to save the report, and select the Save button. The report is saved.